


5 out of 5

Product Description
Price is for each.
Manufacturer Part Number: 6400
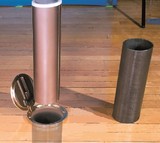
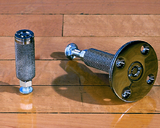
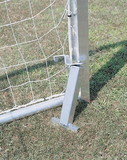
Volleyball Floor Sleeves are constructed of heavy-gage steel for increased support of volleyball uprights in indoor facilities allow uprights to be removed and stored out of the way of other court activities. Designed for use with floating and non-floating synthetic floors, the 6400 is 3 1/2" OD sleeve with 10" depth is compatible for 3 1/2" uprights.
Additional Specifications:
Product Material: STEEL
Country of Origin: US
Specifications
Warranties
 Attention CA Residents: Prop 65 Warning
WARNING:
This product can expose you to chemicals which are known to the State of California to cause cancer, birth defects, or other reproductive harm. For more information, go to www.p65warnings.ca.gov.
Product Warranty
This item has a three years warranty.
Need more information?
Our staff are available to answer any questions you may have about this item
Our staff are available to answer any questions you may have about this item
Customer Reviews
By Me like
Date: February 19, 2023
Was very easy to assemble as well as well built
Rating:  [5 of 5 Stars!]
[5 of 5 Stars!]
By Karen P
Date: August 31, 2022
I read lots of reviews on this. The one thing I hesitated on, was the difficulty in adjusting the lights. When I first tried the canopy, without fully assembling, it was indeed near impossible. However, when I took it back apart to finish the assembly, the idea came to me. Per the photos, this solves a lot of issues. I used painters tape, measured, and the split the 2 rails and inserted into their holes. Now, when I want to readjust the lights, I simply find the line that matches. To easily adjust the canopy, don't try to do one side, and then the other. You will get frustrated and want to throw it out. Simply remove the canopy, remove the rails, unscrew the slider and adjust to where you want it, and replace them and then the canopy. It takes a few seconds and it's all easy. Another biggy- adding the lamp clips, put them in place, and lightly put the nuts on- but don't tighten. Once all 4 are in place, flip the canopy to the top and use a philips screwdriver to tighten them down. You will not need to hold the nuts, they will still tighten. Lightbar install- Pay XTRA attention to the light ends. the none plugged side, will need to be flush, with one end of the canopy. If you make the mistake I did, you will find it's harder to take them off, than it was HARD to snap into place-Hint, you won't be able to slide them either. Make sure that end is touching the end of the canopy before you snap anything in place. Just take your time and it will go smoother. My first one took me at least an hour, of mostly frustration. The second- 10 minutes. Oh, one more quick tip- 3 of my lights rattled and I was afraid they may not be any good, so test your bulbs before installing. All of them ended up being good. I like this thing, and would not hesitate to buy more, which I may end up doing.
Rating: [5 of 5 Stars!]
[5 of 5 Stars!]
By A Customer
Date: April 24, 2022
This was the first time I had tried starting seeds with a grow light. It was fantastic! Ready to plant my tomatoes and squash in the ground. It was exciting to watch the plats grow!
Rating: [5 of 5 Stars!]
[5 of 5 Stars!]
By born too late
Date: December 29, 2021
I received this as a gift, so I won't comment on the value. I also have only just started using it, so I'm not yet commenting on how well it works. However, in this preliminary stage I am pleased. It's a nice size and everything is included and it has a solid, durable feel to it.My caveat is related to putting it together. Let me stress that it is NOT complicated. However, the. instructions are scant. Also, the instructions received in my box were for the single light micro set up, which caused some initial confusion. They appear to both work and go together much the same way, however the instructions referred to only two screws, nuts and ballast clamps and a single grow light, whereas I had double quantities because I have the larger set up with two grow lights.Regarding the instructions:it says to insert the screws, then turn it upside down and add the clamps and nuts. Don't. Your screws will fall out and they are small and easy to lose. Start out with it upside down, insert your first screw from underneath, keeping it in place with your off hand and then adding the clamp and nut. Do this for each one at a time. The nuts are very small and there isn't much room for manipulating them. But by holding the screw in place underneath, I found that I could twist the entire clamp rather than just the nut. The edges are sharp, though, so be careful.It also says to insert your light bars into the clamps next, and then attach the power cord. Don't. You won't have room to manipulate. Attach the power cord FIRST. An additional upside to this: the lights have both a male and female end, and you want to make sure both lights, if you have two, are the same. Attaching the power cord first ensures you won't accidentally do it wrong. If you have skipped this and discovered your error, it is possible to pry one side of the clamp away EVER SO SLIGHTLY with a flat screwdriver, but VERY CAREFULLY. You don't want to damage the lights. Also, note which end is going to be closer to your outlet before you plug everything in.My set up included two reflector strips, but no instructions on how to attach them. Turns out, they go between the 'bulb' and the ballast. My bulbs were already in place, but removing them was not difficult. If you've worked with fluorescent bulbs before, you know the deal. Twist the end slightly in place and it will slide out of the groove easily. Once the bulb is out, the reflector strip (CAREFULLY remove protective film first. It is very very thin. It would be easy to remove the entire reflector strip by mistake) sits lightly on top of the ballast and then you put the bulb back, sliding both ends into the grooves and then giving it a sight twist to seat the bulbs properly. You may feel some slight resistance, but if it doesn't give, try twisting the other way, don't force it too hard.The rest of the set up was simple and obvious. Do put the nut in place first. The shape of the groove it fits into will hold it in place, but keep nut side up will ensure the don't fall out while you are attaching the knob. It works just fine that way. I think it would have been nice if the support poles were marked to make it easier to know if you are adjusting the height of the lights evenly on both sides, but that's a minor quibble. It also would be nice if it had a timer feature, and I plan to attach one separately.
Rating: [5 of 5 Stars!]
[5 of 5 Stars!]
By W. Barnes
Date: August 10, 2020
This all in one grow light unit is compact and convenient. The light hood is a bit difficult to raise and lower. But done carefully while standing above the unit and trying to raise both sides at the same time works.I'm using it on a timer 20 hours per day. I started off at 16 hours per day, but my plants were getting leggy. The lights are maintained at about an inch or two above my plants.Presently I am growing lettuce, kale and collard seedlings. The lettuce is doing pretty well. The kale is somewhat leggy and the collards are very leggy. Two T5 bulbs just don't put out enough light for brassicas. Now I'm a bit worried about how my tomatoes and peppers will do in the spring. As a rule they need much more light then greens.I might try to buy another T5 light and install it in the hood. Or I might just need to buy a Light stand that has four T5 bulbs.If you don't need as much light as I do for your plants I highly recommend this unit. It is made in the UK and seems very safe. It does not get too hot and the switch works well and seems sturdy.
Rating:  [4 of 5 Stars!]
[4 of 5 Stars!]
Items 1 - 5 of 5 reviews
1